We use YAML configuration files with Python scripts to keep environment parameters, variables, keys, and other settings separate from the application code.
You may be familiar with JSON configuration, as it’s a common standard for managing settings in Python. However, YAML offers several advantages over JSON:
Uses clean indentation instead of brackets and commas making it easier to read and write in configuration files.
Comment-friendly
Supports nesting, making it ideal for hierarchical configurations
Sometimes YAML files don’t require many changes, but when edits become frequent, manually updating them can be error-prone and a hassle, such as a variable to determine the deployment environment (i.e. production vs development):
Environment : “production”
# other sample configs
To help with variable management, we can leverage the Jinja templating engine.
What are Jinja templates?
If you're familiar with Flask, chances are you've used Jinja; it's a templating engine that lets you:
Embed Python-like expressions inside text files (HTML, XML, YAML, etc.).
Keep data separate from presentation.
Reuse templates with dynamic values.
The idea behind templating is that when a configuration change is needed, the configuration file isn't changed directly.
Instead, we'll update the variables that are associated with the configuration.
By using Jinja templates, we can dynamically generate and maintain separate configuration files for each environment, keeping them completely decoupled from the master configuration structure.
This makes the system more flexible, secure, and easier to manage across dev, staging, and production setups.
Looking to accelerate your Data Science/ML skills?
Let’s face it - there’s a plethora of information out there. Some go too deep into the content, some stay surface-level, but nothing is just right.

This reference sheet bundle aims to be the just right balance - it contains everything you need to know without the information overload for the 3 packages critical for all data workflows: Pandas, NumPy, and Matplotlib.
It’s perfect for someone who may have some-or-none knowledge of these packages and wants to cut through the noise of AI and other tutorials that are too much.
Working with an Example Jinja Template
Before diving in, it’s important to understand how all of this is working together:

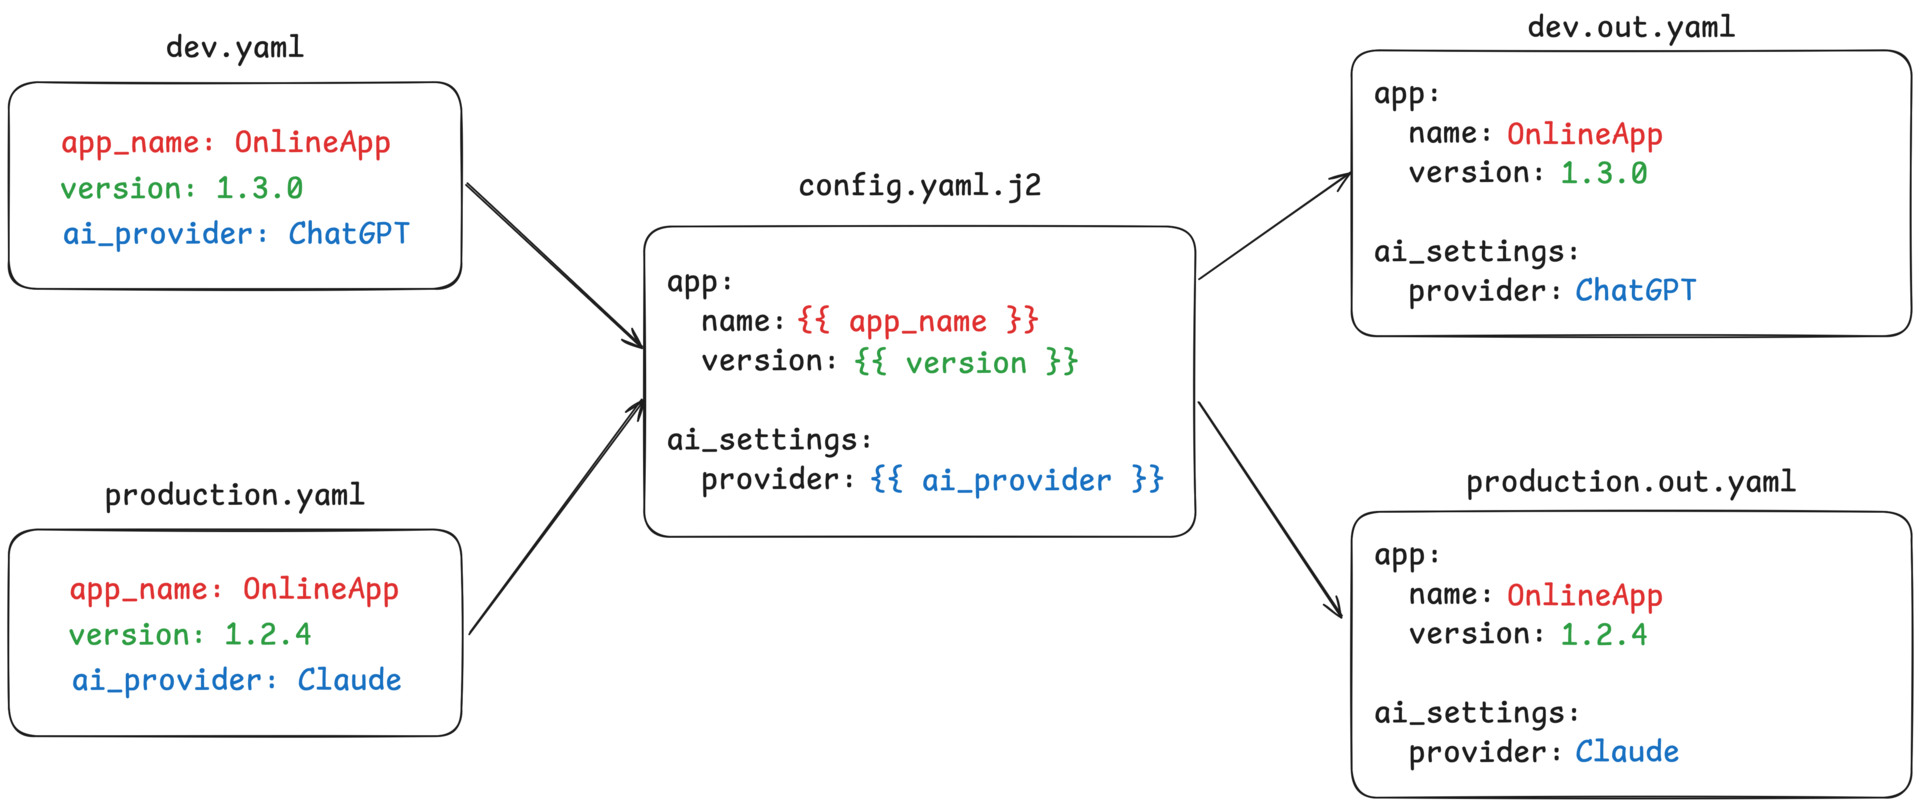
Jinja Templating Example
You have 2 files on the left side of this diagram: dev.yaml and production.yaml. These files will hold configurations for your application.
In the middle you have a “template” that Jinja will be able to read: config.yaml.j2. This tells Jinja “I want you to map these variables from the input file, and here is how I want you to do it”.
After invoking a Python script (below),
If you’d like to see how it works, first ensure that jinja2 and PyYAML are installed in a virtual environment:
pip install pyyaml jinja2» PyYAML is the package used to read and write to/from YAML files
Create two separate files: dev.yaml and production.yaml to hold the variables for each environment:
#dev.yaml
app_name: OnlineApp
version: 1.3.0
ai_provider: ChatGPT

#production.yaml
app_name: OnlineApp
version: 1.2.4
ai_provider: Claude
Next, create the master config file, which shows us how the configuration files should be structured (i.e. “template”) and name it config.yaml.j2:
app:
  name: {{ app_name }}
  version: {{ version }}

ai_settings:
  provider: {{ ai_provider }}
Your project structure should look like this before running the python script:
app1/                 # folder name
|-- config.yaml.j2    # Jinja template Master Config file.
|-- prod.yaml         # Variables for production environment
|-- dev.yaml          # Variables for dev environment
|-- render_config.py  # Script to render YAML files
The below Python script will generate two files ending in ‘out.yaml‘ which will have updated configurations according to the variable files and structure same as the config.yaml.j2 from earlier:
import yaml
from jinja2 import Environment, FileSystemLoader

# Setup Jinja and load the template
env = Environment(loader=FileSystemLoader("."))
template = env.get_template("config.yaml.j2")

# Create each file from the template.
for vars_file in ["dev.yaml", "production.yaml"]:
    with open(vars_file) as f:
        vars_data = yaml.safe_load(f)


    rendered = template.render(**vars_data)
    output_file = vars_file.replace(".yaml", ".out.yaml")

    with open(output_file, "w") as f:
        f.write(rendered)

    print(f"Rendered: {output_file}")
When this code is executed, it will produce 2 newly generated dev.out.yaml and production.out.yaml files:
dev.out.yaml
app:
  name: OnlineApp
  version: 1.3.0

ai_settings:
  provider: ChatGPT
production.out.yaml
app:
  name: OnlineApp
  version: 1.2.4

ai_settings:
  provider: Claude
Summary
Jinja lets you embed environment-related variables inside text files (such as JSON or YAML) by defining a master config structure, then injecting variables from separate YAML files for each environment.
By leveraging Jinja templates and PyYAML, we can create a single template and automatically generate multiple configuration files for different environments, all sharing the same structure.
This approach keeps code and configuration separate, while reducing manual edits and minimizing the risk of errors.
Happy coding!
📧 Join the Python Snacks Newsletter! 🐍
Want even more Python-related content that’s useful? Here’s 3 reasons why you should subscribe the Python Snacks newsletter:
Get Ahead in Python with bite-sized Python tips and tricks delivered straight to your inbox, like the one above.
Exclusive Subscriber Perks: Receive a curated selection of up to 6 high-impact Python resources, tips, and exclusive insights with each email.
Get Smarter with Python in under 5 minutes. Your next Python breakthrough could just an email away.
You can unsubscribe at any time.
Interested in starting a newsletter or a blog?
Do you have a wealth of knowledge and insights to share with the world? Starting your own newsletter or blog is an excellent way to establish yourself as an authority in your field, connect with a like-minded community, and open up new opportunities.
If TikTok, Twitter, Facebook, or other social media platforms were to get banned, you’d lose all your followers. This is why you should start a newsletter: you own your audience.
This article may contain affiliate links. Affiliate links come at no cost to you and support the costs of this blog. Should you purchase a product/service from an affiliate link, it will come at no additional cost to you.

